Complete Core Training


For results in both aesthetics as well as athletic performance, it’s important to train the core in three separate categories of movement: anti-extension, anti-rotation and anti-lateral flexion.

Anti-extension Exercises: teach us how to maintain a neutral spine position. Maintaining a neutral spine and properly bracing your core during exercise will help prevent spinal injuries due to over-arching.

Dead Bug

1)Lie on your back and bring your hips and knees to 90 degrees. 

2)Raise your arms straight up toward the ceiling, keeping your wrist in line with your shoulders. Before you start, focus on keeping your lower back pressed into the floor. 

3) Inhale and lower one arm and the opposite leg out, leaving the other arm and leg in the starting position. 

4)Lower them as far as you can without your low back coming off the floor. Exhale at the bottom. 

5)Return to the start position and repeat with the other arm and leg. Try 5 reps per side and work towards 10 per side.

Anti-Rotational Exercises: are exercises that build stability and strength to prevent spinal rotation between the pelvis and ribs.

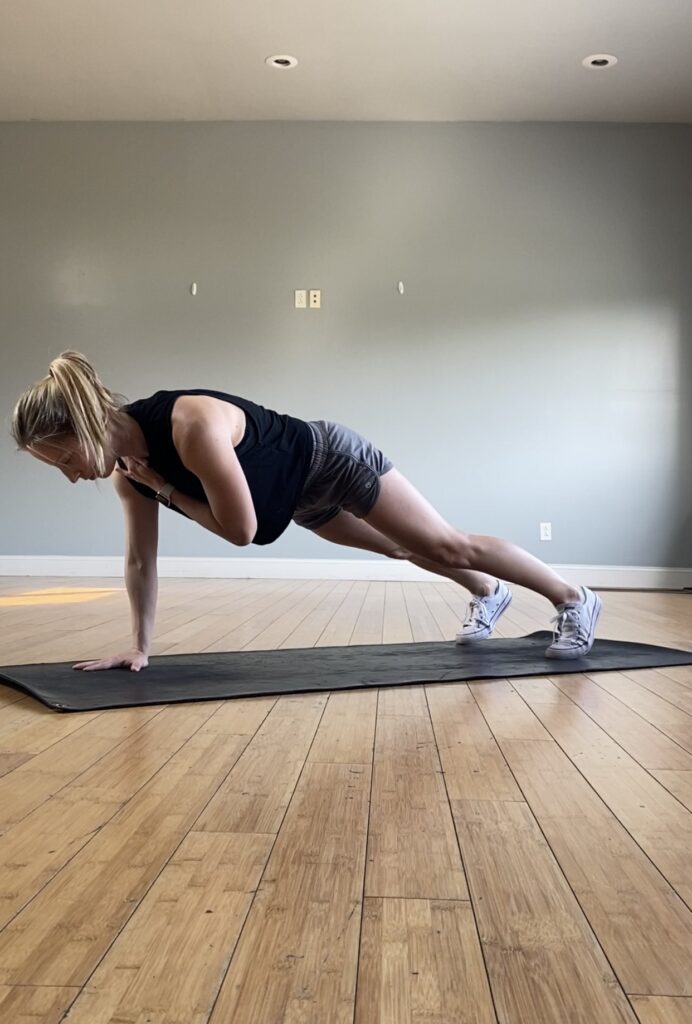
Plank shoulder taps

1)Set up in a high plank position from your hands and toes. You want your hands to be under your shoulders. Your feet can be further apart to provide a more stable base. 

2)Brace your abs and engage your glutes so that your body is in a straight line.

3)As you lift one hand up off the ground to touch the opposite shoulder, press into the heel of your opposite hand for stability. 

4)Once you’ve tapped your opposite shoulder, bring the hand down and alternate sides.

4)Keep your hips square to the ground and do not rotate. Avoid letting your butt go up in the air or your hips sag toward the ground.

5) Try 5 shoulder taps per side to begin with and try building to 10 taps per side.

Anti-lateral Flexion Exercises: require you to resist bending sideways.

Side plank

1)Lie on your right side, legs extended feet either stacked or staggered, one in front of the other. Whichever is most comfortable for you.

2)The elbow of your right arm is directly under your shoulder. Ensure your head is directly in line with your spine. Your left arm can be aligned along the left side of your body.

3)Engage your abdominal muscles as if you’re bracing for a punch.

4)Lift your hips and knees from the mat while exhaling. Your torso is straight in line with no sagging or bending. Hold the position.

5)After several breaths, inhale and return to the starting position. 

6)Try 20 seconds per side for a starting point with a goal of building up to 60 seconds.
How to Get Your First Push-Up

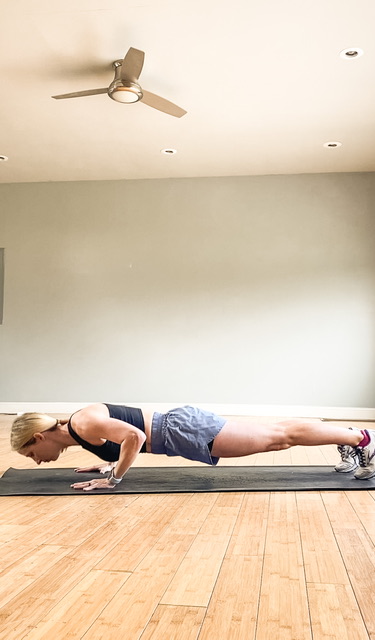
Push-ups are a deceptively difficult, yet empowering exercise. They strengthen the chest, shoulders, triceps, and abdominals. Nailing the form details can make the difference in you getting your first push-up sooner rather than later.

Creating stability from head to toe throughout your push-up is not only crucial for efficiently pressing your body away from the floor from head to toe. It also makes this task feel much easier than performing with improper form. 

The  best exercises to get your first push-up are the wall push-up, incline push-up variations, eccentric push-up, and concentric push-up. Once you’re able to complete 3 sets of around 8-10 reps of an exercise, feel free to move on to the next progression. You’re getting stronger!

Progressing from zero push-ups to your first push-up will look like this:

  1. Wall push-up
  • Place your hands on a wall about chest high. 
  • Body is in a straight line and the chin tucked (neutral position).
  • Your hands are shoulder-width apart, fingers spread, thumbs will be at your nipples at the bottom position.
  • Your shoulders are over your elbows. Elbows over your wrists. → Stack your joints.
  • Take a deep breath in, brace your core, tuck your ribs towards your hips, and squeeze your glutes.
  • Lower yourself with control. Keep elbows pointing back and forearms vertical. Think about your body looking more like an arrow than the letter “T” in the bottom position.
  • As you return to the top position, exhale.
  1. Waist-level Incline Push-Up

The closer we move towards both hands and feet on the floor, the more challenging the exercise and the closer we get to our first full push-up.

  • Place your hands on a surface (bench, couch, sturdy chair, etc) around the same level as your waist.
  • Body is in a straight line and the chin tucked (neutral position).
  • Your hands are shoulder-width apart, fingers spread, thumbs will be at your nipples at the bottom position.
  • Your shoulders are over your elbows. Elbows over your wrists. → Stack your joints.
  • Find your preferred foot width. Your feet can be either together, shoulder width apart, or somewhere in between.
  • Take a deep breath in, brace your core, tuck your ribs towards your hips, and squeeze your glutes.
  • Lower yourself with control. Keep elbows pointing back and forearms vertical. Think about your body looking more like an arrow than the letter “T” in the bottom position.
  • As you return to the top position, exhale.
  1. Knee-level Incline Push-Up

We’re moving even closer to the floor.

  • Place your hands on a surface (bench, couch, sturdy chair, etc) around the same level as your knees.
  • Body is in a straight line and the chin tucked (neutral position).
  • Your hands are shoulder-width apart, fingers spread, thumbs will be at your nipples at the bottom position.
  • Your shoulders are over your elbows. Elbows over your wrists. → Stack your joints.
  • Find your preferred foot width. Your feet can be either together, shoulder width apart, or somewhere in between.
  • Take a deep breath in, brace your core, tuck your ribs towards your hips, and squeeze your glutes.
  • Lower yourself with control. Keep elbows pointing back and forearms vertical. Think about your body looking more like an arrow than the letter “T” in the bottom position.
  • As you return to the top position, exhale.
  1. Eccentric Only Push-Up

We’re now on the floor focusing on just the lowering portion of the push-up and making massive strength gains getting us even closer to that first push-up.

  • Get into a tall plank position. Body is in a straight line and the chin is tucked (neutral position).
  • Your hands are shoulder-width apart, fingers spread, thumbs will be at your nipples at the bottom position.
  • Your shoulders are over your elbows. Elbows over your wrists. → Stack your joints.
  • Take a deep breath in, brace your core, tuck your ribs towards your hips, and squeeze your glutes.
  • Take about 4 full seconds to lower yourself with control to the floor.
  • Keep elbows pointing back and forearms vertical. Think about your body looking more like an arrow than the letter “T” in the bottom position.
  • Once you’ve fully lowered yourself to the ground. Come up on your knees to return to the starting position and exhale.
  1. Concentric Only Push-Up

Here we’ll focus on just the upward portion of the push-up and building up our power from the floor.

  • Get into the bottom position of a push-up with your forehead, torso and lower body are in full contact with the floor
  • Take a deep breath in, brace your core, tuck your ribs towards your hips, and squeeze your glutes.
  • Gaze directly down to a spot on the floor/surface. Your eyes should remain fixed on this spot throughout the repetitions. 
  • Keep elbows pointing back and forearms vertical. Think about your body looking more like an arrow than the letter “T” in the bottom position.
  • Once you’ve fully lowered yourself to the ground. Come up on your knees to return to the starting position and exhale
  1. Full Push-Up

You made it! And by now you’ve got the form nailed down, but reminders never hurt.

  • Get into a tall plank position. Body in a straight line and chin tucked (neutral position).
  • Your hands are shoulder-width apart, fingers spread, thumbs will be at your nipples at the bottom position.
  • Your shoulders are over your elbows. Elbows over your wrists. → Stack your joints.
  • Your hands are shoulder-width apart, fingers spread, thumbs will be at your nipples at the bottom position.
  • Find a spot on the floor and stare at this spot throughout the exercise. 
  • Take a deep breath in, brace your core, tuck your ribs towards your hips, and squeeze your glutes.
  • Lower yourself with control. Keep elbows pointing back and forearms vertical. Think about your body looking more like an arrow 
  • Focus on your body looking more like an arrow than the letter “T” in the bottom position.
  • As you return to the top position, exhale.

*This post was adapted from an article I wrote for PreWorkout.org which you can read by clicking on this link.

Signs You Aren’t Eating Enough

“Take care of your body. It’s the only place you have to live.”- Jim Rohn

Spring has arrived, which means summer will be here before we know it. Many folks begin to focus on weight loss goals in May. So I just wanted to put out a gentle reminder…

If you have weight loss goals…

🐢slow and steady 🐌 

…is the healthiest and most sustainable way to go. 

How slow and steady? To preserve most of your muscle mass (not just for looks **)around 0.5-1.5 lbs per week is a general recommendation. But YOUR body will let you know if you’re losing weight too fast for YOU.

Here are some signs:

  • feeling cold
  • trouble sleeping
  • constipation
  • low libido
  • frequent or constant hunger
  • irritability 
  • hair loss
  • weak immune system/ frequently sick /can’t get well 
  • anxiety and/or depression
  • brain fog

**Why is muscle mass important?

  • Quality of life and independence (especially as we age)
  • Preventing osteoporosis 
  • Lowering your heart rate
  • Managing blood sugar
  • Protection from injury
  • Stronger immune system
  • Improved energy levels
  • Overall healthy aging 

Leg Workout at Home for Women


This circuit is perfect if you’re short on time and want to get in some strength training + cardio.

Also, if the seasonal change is killing your motivation, incorporating circuits into your workout program might help. Circuits = no rest periods between the exercises. So you won’t be tempted to drag out those rest periods scrolling your phone, chit chatting, etc.

Doing the workout with no interruptions and getting it over and done with will feel GOOD.

If you want to make any of the first 6 exercises more difficult, just add more weight. You can also add weight to the clamshells by holding a dumbbell in place on the top hip.

The workout (repeat for 3-4 rounds):


20 chair squats
15 romanian deadlifts
15 lateral squats (hello inner thighs!)
10 reverse lunges each side
30 knee banded glute bridges
15 single leg glute bridges each side
30 knee-banded seated hip abduction (10 sitting straight up, 10 lean forward, 10 lean back)
30 knee-banded clamshells each side (lose the band if it’s too challenging)

What are macros?

🍽️Here’s a quick run down about macros

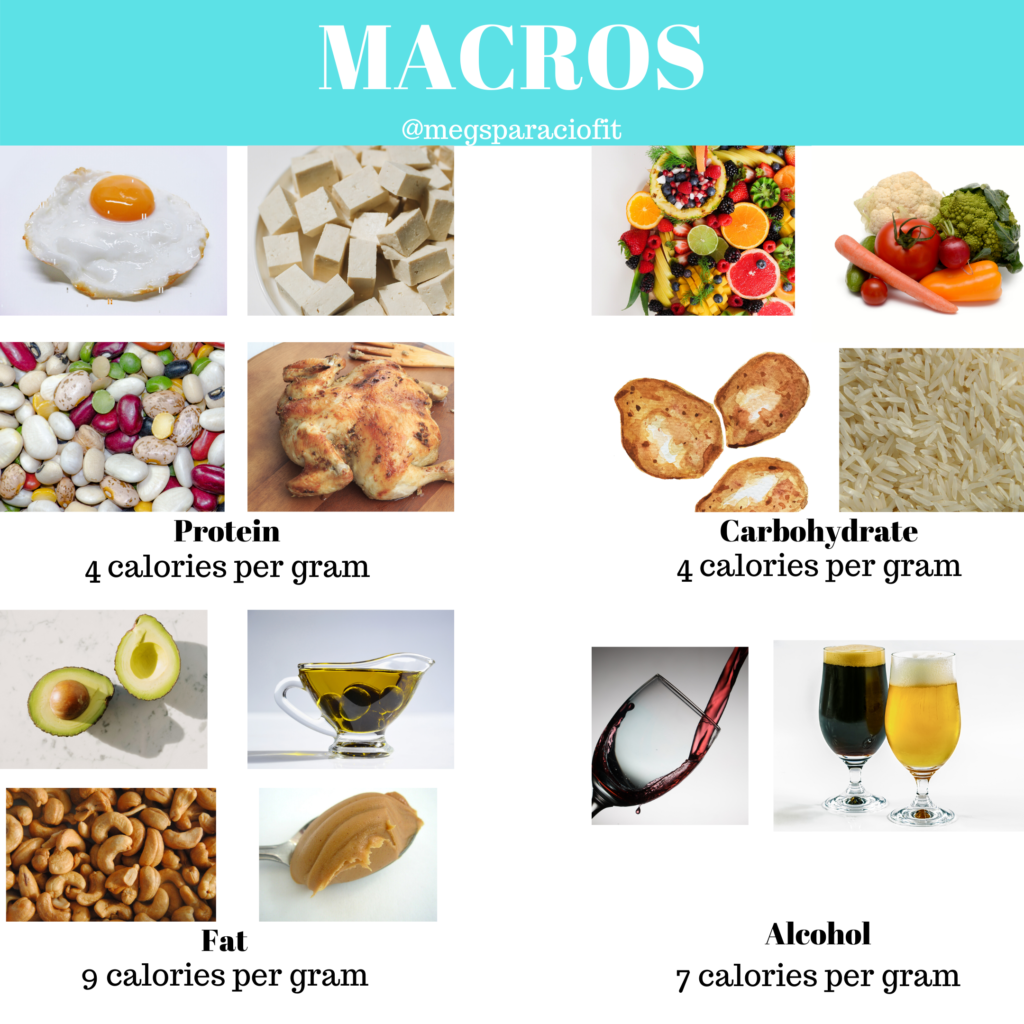
🍴MACRONUTRIENTS (macros) are the nutrients your body needs in large amounts. There are three major macros: Protein, Carbohydrates, and Fat. Technically alcohol is the fourth.


🔥A CALORIE is the amount of energy needed to raise the temperature of 1 gram of water by 1 degree Celsius. When the word “calorie” is used when talking about food, we are usually using a casual definition of calorie. But we’re actually referring to kilocalories, which is what you see on nutrition labels. A kilocalorie is the equivalent of 1,000 calories.

🥩PROTEIN is vital to muscle building as well as many other processes. Animal sources of protein include: meat, poultry, fish, eggs, and dairy. These deliver all the amino acids your body needs. Plant sources of protein include: tofu, lentils, chickpeas, quinoa, nuts, and more. While plant based sources often lack one or more of the essential amino acids, a well-planned vegetarian or vegan diet can provide you with all the nutrients you need.

🍚CARBOHYDRATES are your body’s primary energy source. Sources of carbs: Fruits, vegetables, grains, and potatoes.

🥑FATS are essential for hormone function. Sources of fat: butter, oil, nuts, seeds, avocado, and other foods.

🍷ALCOHOL is not needed in our body. If you’re counting calories for any reason, you can’t forget these! 1 gram of alcohol has 7 calories.

🧮HOW do these calories add up?

Total Calories =
(Number of grams of protein x 4) +
(Number of grams of carbs X 4) +
(Number of grams of fat X 9) +
(Number of grams of alcohol X 7)

SMART Goals

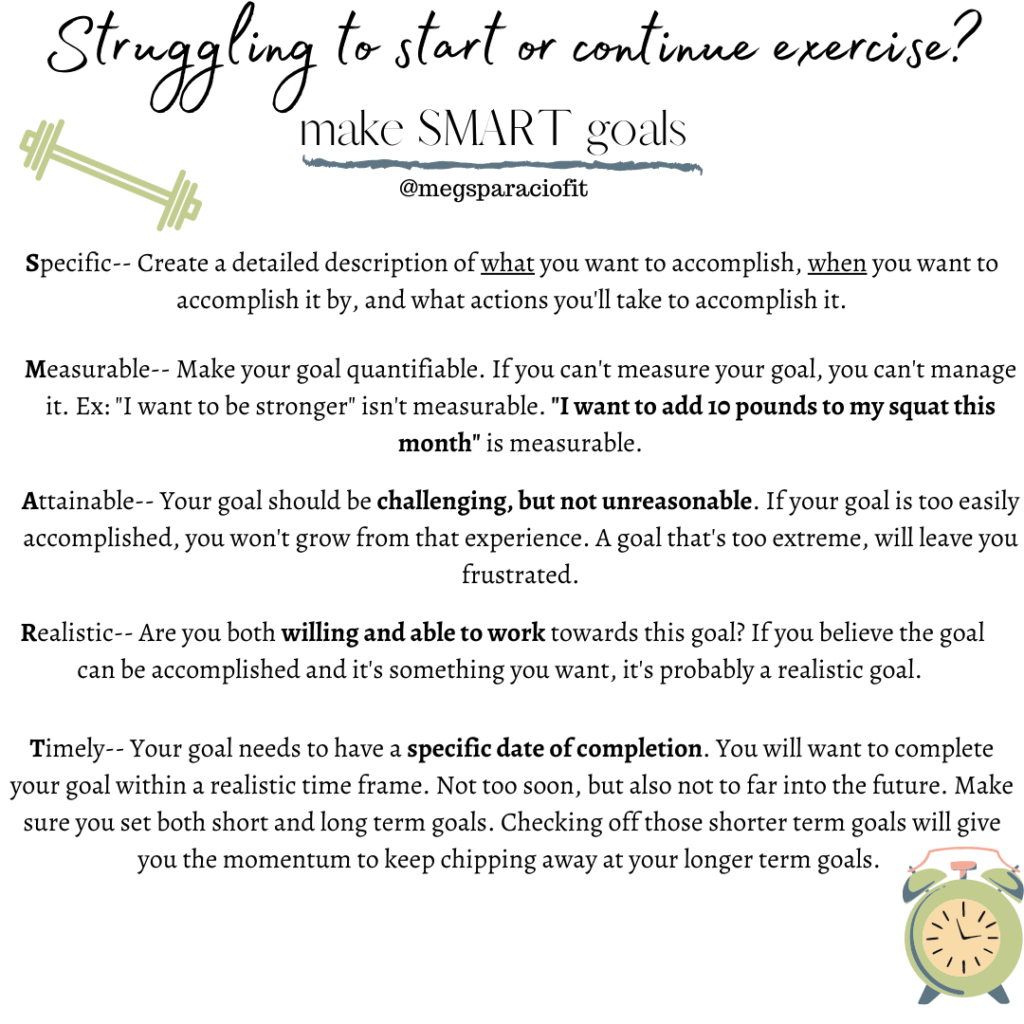
🧠 Become an effective goal setter with SMART goals

When we first start thinking about our goals, what we usually come up with are broad terms or vague ideas. “I want to look good.” That’s a start, but if we really want to succeed we have to get more detailed and make a plan.

🏝 Let’s say we have a client named Kevin and he wants to feel more confident on an upcoming beach vacation. We ask Kevin more questions and discover that what he actually wants is to lose 10 pounds of extra weight for his vacation in three months. He’s 37 years old, 5’11”, weighs 200 pounds, and has no medical conditions. Here’s how we can make Kevin’s goal SMART:

👉🏻Specific- Kevin would like to lose 10 pounds in 3 months.
⚖️Measurable- A scale can be used to measure overall weight loss. If there are other body composition goals, these changes can be measured and tracked as well.
🧗Attainable- A 10 pound loss in 3 months is an attainable goal.
👍🏼Realistic- At his height and weight, 10 pounds in 3 months is attainable for Kevin.
Timely- 10 pounds can be lost in 3 months at a steady and sustainable rate.

💪🏼If you have a goal of your own in mind, get started with your plan by asking yourself these action-oriented questions:

❓What is my goal?
📆 When would I like to have this goal accomplished?
💰 What do I need to accomplish this goal? (Support from friends/family, money, time, gym equipment)
🤒 What are some possible challenges I could face on my journey to reach my goal? (missing workouts, holiday goodies, out of town trips, etc)
👟What steps can I take each day to keep moving in the right direction?

😁Answering these questions will serve many benefits. Not only will you be developing a plan of action, but you’ll also feel empowered, focused, and motivated.


💪🏼🔥Happy goal crushing!

Quick Beginner Ab Workout

A quick ab workout that focuses on stability.

Did you know that your abdominal muscles are just one part of your core? Your core is actually defined by the structures that make up your lumbo-pelvic-hip complex, including the lumbar spine, the pelvic girdle, abdomen, and the hip joint.

Your core is made up of three systems: the local stabilization system, the global stabilization system, and the movement system.

Local Stabilization System

Muscles that attach directly to the vertebrae. These muscles contribute to spinal stability by increasing intra-abdominal pressure, generating tension in the thoracolumbar fascia which increases spinal stiffness for improved neuromuscular contril.

  • Transverse abdominis
  • Internal oblique
  • Lumbar multifidus
  • Pelvic floor muscles
  • Diaphragm

Global Stabilization System

Muscles attach from the pelvis to the spine. These muscles transfer loads between the upper and lower extremities, provide pelvis and spine stability, and stabilize and eccentrically control the core during functional movements.

  • Quadratus lumborum
  • Psoas major
  • External oblique
  • Portions of internal oblique
  • Rectus abdominis
  • Gluteus medius
  • Adductor complex

Movement System

Muscles that attach the spine and/or pelvis to the extremities. These muscles are mostly responsible for concentric force production and eccentric deceleration during activities.

  • Latissimus dorsi
  • Hip flexors
  • Hamstring complex
  • Quadriceps

Why is it important to have a stable core?

Your core is the origin of all movement and where the center of gravity for your body is located. An unstable core during movement will not allow for optimal stabilization, force reduction, force production, or transference to occur throughout your body. An efficient core is not only vital for proper movement and balance throughout your body, but it is also important for injury prevention.

Strength vs. Stability

Do we want a strong core or do we want a stable core? Well, we want both. But often exercises that stabilize the core are underutilized and that can cause problems. If the musculature of your core movement system is strong, but the stabilization system is weak, your body will not be able to optimally use or transfer forces.

Strength exercises are not as efficient as isometric exercises at improving core stiffness. Stiffness is important for stability. When the muscles of our core contract, stiffness is created.

What is a strength exercise? A crunch, leg lifts, or side bend.

What is an isometric exercise? It is a hold. It is a static contraction of the muscle without visible movement. For example: plank, side plank.

About the Exercises in the Video

Deadbug

The dead bug exercise is a popular way to build core strength and stabilization. It especially targets the transverse abdominis and spinal erectors.

Mountain Climbers

Mountain climbers are a full-body exercise, which means it can get your heart rate up quickly. As you perform the move, your shoulders, arms, and chest work to stabilize your upper body while your core stabilizes the rest of your body.

Inchworm

This exercise helps strengthen the muscles of your anterior chain (the front half of your body) while stretching the muscles of your posterior chain (the back half of your body). What does this have to do with your core? If you do not properly engage your core, you will not be able to perform the exercise effectively with proper form.

Bird Dog

The bird dog strengthens the abdominal muscles, lower back, glutes, and quads while also challenging your balance which helps strengthen your stabilization system.

Side Plank

The side plank strengthens the oblique abdominal muscles, which are very useful as core stabilization muscles. It also activates gluteus medius.

Bear Shoulder Taps

Bear with shoulder taps challenges the shoulders, chest, core, legs, arms, and back. In trying to minimize movement in your trunk, you are working to strengthen your stabilization system.

Squats for Beginners

I’m sure everyone would agree that jumping straight to a barbell back squat is not a good idea if you’re a beginner. Here’s a video progression to work yourself up to where you are comfortable with a barbell back squat:

How to Progress Your Squat for Beginners


So, how should a beginner progress their squat?

Here’s a great squat progression sequence:

  1. Wall squat
  2. Counterbalance squat
  3. Bodyweight squat
  4. Goblet squat
  5. Double kettlebell front squat
  6. Barbell front squat
  7. Barbell back squat

So that’s my favorite progression for squats. If you’re a beginner and you have any questions, don’t hesitate to contact me!

Easy Chicken and Vegetable Stir Fry Recipe

This easy stir fry is a great way to load up on protein and veggies.

Ingredients

  • 2 tbsp olive oil
  • Salt and pepper to taste
  • 1 lb chicken breast, cut into bite sized pieces
  • ½ yellow onion, chopped
  • 1 red or yellow bell pepper, chopped
  • 1 zucchini, sliced
  • 2 cloves of garlic, minced

Soy Garlic Stir Fry Sauce

  • 1 clove garlic, minced
  • 1 tsp finely grated ginger
  • 1 tsp Chili Garlic Sauce
  • 1 tbsp rice vinegar
  • 1 cup soy sauce
  • 2 tbsp water
  • 1 ½ tsp sesame oil
  • 1 ½ tsp lemon juice
  • 6 scallions, finely sliced

Instructions

  1. Add olive oil to a large skillet on medium high heat. 
  2. Add chicken and season with salt and pepper. Cook for 3 to 5 minutes or until browned and almost cooked through. 
  3. Add onion, garlic, and veggies and cook, stirring occasionally, just until crisp tender. 
  4. Whisk stir fry sauce and pour ¼ cup over chicken and vegetables and stir gently to combine.
  5. Bring to a boil, stirring occasionally, and let boil for one minute.
  6. Enjoy with either basmati or cauliflower rice! Top with any of the remaining stir fry sauce if desired!

** This recipe makes a lot of stir fry sauce. I save the rest and use it to reheat leftovers.

You should also feel free to add or substitute any veggies of your choice. We’ve used broccoli, carrots, peas, and cabbage. All are delicious!