Complete Core Training


For results in both aesthetics as well as athletic performance, it’s important to train the core in three separate categories of movement: anti-extension, anti-rotation and anti-lateral flexion.

Anti-extension Exercises: teach us how to maintain a neutral spine position. Maintaining a neutral spine and properly bracing your core during exercise will help prevent spinal injuries due to over-arching.

Dead Bug

1)Lie on your back and bring your hips and knees to 90 degrees. 

2)Raise your arms straight up toward the ceiling, keeping your wrist in line with your shoulders. Before you start, focus on keeping your lower back pressed into the floor. 

3) Inhale and lower one arm and the opposite leg out, leaving the other arm and leg in the starting position. 

4)Lower them as far as you can without your low back coming off the floor. Exhale at the bottom. 

5)Return to the start position and repeat with the other arm and leg. Try 5 reps per side and work towards 10 per side.

Anti-Rotational Exercises: are exercises that build stability and strength to prevent spinal rotation between the pelvis and ribs.
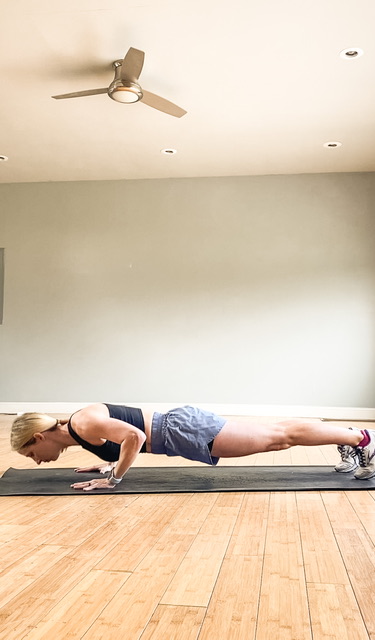
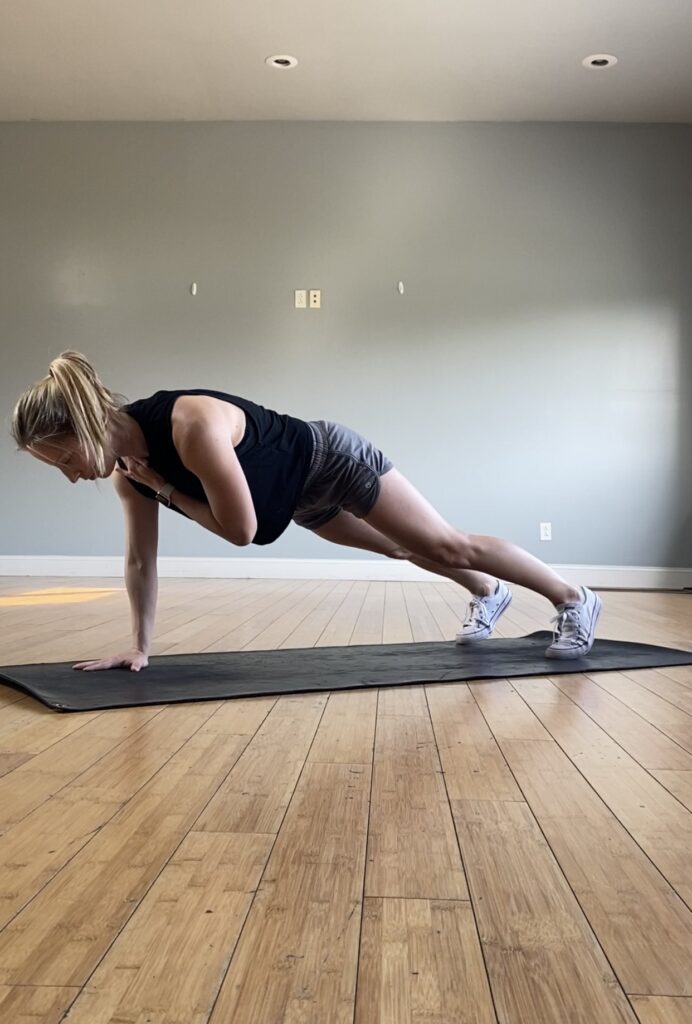
Plank shoulder taps

1)Set up in a high plank position from your hands and toes. You want your hands to be under your shoulders. Your feet can be further apart to provide a more stable base. 

2)Brace your abs and engage your glutes so that your body is in a straight line.

3)As you lift one hand up off the ground to touch the opposite shoulder, press into the heel of your opposite hand for stability. 

4)Once you’ve tapped your opposite shoulder, bring the hand down and alternate sides.

4)Keep your hips square to the ground and do not rotate. Avoid letting your butt go up in the air or your hips sag toward the ground.

5) Try 5 shoulder taps per side to begin with and try building to 10 taps per side.

Anti-lateral Flexion Exercises: require you to resist bending sideways.

Side plank

1)Lie on your right side, legs extended feet either stacked or staggered, one in front of the other. Whichever is most comfortable for you.

2)The elbow of your right arm is directly under your shoulder. Ensure your head is directly in line with your spine. Your left arm can be aligned along the left side of your body.

3)Engage your abdominal muscles as if you’re bracing for a punch.

4)Lift your hips and knees from the mat while exhaling. Your torso is straight in line with no sagging or bending. Hold the position.

5)After several breaths, inhale and return to the starting position. 

6)Try 20 seconds per side for a starting point with a goal of building up to 60 seconds.

How to Get Your First Push-Up

Push-ups are a deceptively difficult, yet empowering exercise. They strengthen the chest, shoulders, triceps, and abdominals. Nailing the form details can make the difference in you getting your first push-up sooner rather than later.

Creating stability from head to toe throughout your push-up is not only crucial for efficiently pressing your body away from the floor from head to toe. It also makes this task feel much easier than performing with improper form. 

The  best exercises to get your first push-up are the wall push-up, incline push-up variations, eccentric push-up, and concentric push-up. Once you’re able to complete 3 sets of around 8-10 reps of an exercise, feel free to move on to the next progression. You’re getting stronger!

Progressing from zero push-ups to your first push-up will look like this:

  1. Wall push-up
  • Place your hands on a wall about chest high. 
  • Body is in a straight line and the chin tucked (neutral position).
  • Your hands are shoulder-width apart, fingers spread, thumbs will be at your nipples at the bottom position.
  • Your shoulders are over your elbows. Elbows over your wrists. → Stack your joints.
  • Take a deep breath in, brace your core, tuck your ribs towards your hips, and squeeze your glutes.
  • Lower yourself with control. Keep elbows pointing back and forearms vertical. Think about your body looking more like an arrow than the letter “T” in the bottom position.
  • As you return to the top position, exhale.
  1. Waist-level Incline Push-Up

The closer we move towards both hands and feet on the floor, the more challenging the exercise and the closer we get to our first full push-up.

  • Place your hands on a surface (bench, couch, sturdy chair, etc) around the same level as your waist.
  • Body is in a straight line and the chin tucked (neutral position).
  • Your hands are shoulder-width apart, fingers spread, thumbs will be at your nipples at the bottom position.
  • Your shoulders are over your elbows. Elbows over your wrists. → Stack your joints.
  • Find your preferred foot width. Your feet can be either together, shoulder width apart, or somewhere in between.
  • Take a deep breath in, brace your core, tuck your ribs towards your hips, and squeeze your glutes.
  • Lower yourself with control. Keep elbows pointing back and forearms vertical. Think about your body looking more like an arrow than the letter “T” in the bottom position.
  • As you return to the top position, exhale.
  1. Knee-level Incline Push-Up

We’re moving even closer to the floor.

  • Place your hands on a surface (bench, couch, sturdy chair, etc) around the same level as your knees.
  • Body is in a straight line and the chin tucked (neutral position).
  • Your hands are shoulder-width apart, fingers spread, thumbs will be at your nipples at the bottom position.
  • Your shoulders are over your elbows. Elbows over your wrists. → Stack your joints.
  • Find your preferred foot width. Your feet can be either together, shoulder width apart, or somewhere in between.
  • Take a deep breath in, brace your core, tuck your ribs towards your hips, and squeeze your glutes.
  • Lower yourself with control. Keep elbows pointing back and forearms vertical. Think about your body looking more like an arrow than the letter “T” in the bottom position.
  • As you return to the top position, exhale.
  1. Eccentric Only Push-Up

We’re now on the floor focusing on just the lowering portion of the push-up and making massive strength gains getting us even closer to that first push-up.

  • Get into a tall plank position. Body is in a straight line and the chin is tucked (neutral position).
  • Your hands are shoulder-width apart, fingers spread, thumbs will be at your nipples at the bottom position.
  • Your shoulders are over your elbows. Elbows over your wrists. → Stack your joints.
  • Take a deep breath in, brace your core, tuck your ribs towards your hips, and squeeze your glutes.
  • Take about 4 full seconds to lower yourself with control to the floor.
  • Keep elbows pointing back and forearms vertical. Think about your body looking more like an arrow than the letter “T” in the bottom position.
  • Once you’ve fully lowered yourself to the ground. Come up on your knees to return to the starting position and exhale.
  1. Concentric Only Push-Up

Here we’ll focus on just the upward portion of the push-up and building up our power from the floor.

  • Get into the bottom position of a push-up with your forehead, torso and lower body are in full contact with the floor
  • Take a deep breath in, brace your core, tuck your ribs towards your hips, and squeeze your glutes.
  • Gaze directly down to a spot on the floor/surface. Your eyes should remain fixed on this spot throughout the repetitions. 
  • Keep elbows pointing back and forearms vertical. Think about your body looking more like an arrow than the letter “T” in the bottom position.
  • Once you’ve fully lowered yourself to the ground. Come up on your knees to return to the starting position and exhale
  1. Full Push-Up

You made it! And by now you’ve got the form nailed down, but reminders never hurt.

  • Get into a tall plank position. Body in a straight line and chin tucked (neutral position).
  • Your hands are shoulder-width apart, fingers spread, thumbs will be at your nipples at the bottom position.
  • Your shoulders are over your elbows. Elbows over your wrists. → Stack your joints.
  • Your hands are shoulder-width apart, fingers spread, thumbs will be at your nipples at the bottom position.
  • Find a spot on the floor and stare at this spot throughout the exercise. 
  • Take a deep breath in, brace your core, tuck your ribs towards your hips, and squeeze your glutes.
  • Lower yourself with control. Keep elbows pointing back and forearms vertical. Think about your body looking more like an arrow 
  • Focus on your body looking more like an arrow than the letter “T” in the bottom position.
  • As you return to the top position, exhale.

*This post was adapted from an article I wrote for PreWorkout.org which you can read by clicking on this link.